Building a blog in 2025 with Astro.js
The way to build a blog in 2025 with Astro.js. The story behind this blog creation, the stack, the pros & cons.
Introduction
In an era where content is everywhere and algorithms dictate what we consume, there’s something profoundly human about having your own corner of the internet. A personal blog isn’t just a collection of words — it’s your digital fingerprint, your thoughts unfiltered by corporate interests, and your voice in a world where everyone seems to be shouting at once.
I’ve been thinking about starting a blog for years, but I kept getting stuck in endless planning. Every time I sat down to plan it out, I’d fall into the classic trap: overthinking, over-engineering, and ultimately doing nothing. The options seemed endless, and each came with its own rabbit hole of configurations and “best practices.”
This post is my journey from endless planning to actually shipping something. It’s about why personal blogs matter more than ever in 2025, the mental gymnastics of choosing a tech stack, and how this blog was built with Astro.js.
Setting Clear Requirements
Before diving into any code or choosing a tech stack, I realized I needed to define what I actually wanted. The abstract idea of “a blog” was too vague and was contributing to my decision paralysis. I needed concrete requirements.
My requirements were simple but specific:
- Small and minimalistic - No bloated features, just the essentials
- Easy to deliver - Quick to build and deploy, minimal maintenance overhead
- Easy to customize - Flexible enough to evolve as my needs change
These requirements became my North Star. Every technical decision had to serve at least one of these goals. It’s amazing how much clarity this brought to the process - instead of wondering if I should add this feature or that integration, I could simply ask: “Does this make it smaller, easier to deliver, or easier to customize?”
Choosing the Right Technology
With my requirements clear, I started exploring different options. Should I use WordPress? Too heavy. Next.js? Overkill for a simple blog. The options were endless, and each came with its own rabbit hole of configurations, plugins, and “best practices.”
I’ve used Gatsby before and it’s great, but this time I wanted to try something different. The web moves fast, and I was curious about what else was out there. Sometimes you just want to explore new tools and see how they feel.
I stumbled across Astro.js, and it caught my attention. It wasn’t about finding the “perfect” solution; it was about trying something different and seeing if it felt right.
Content Strategy and Technology Choice
I’ve already mentioned that I chose Astro. I’d never used it before, and I liked their documentation. So I thought, “why not?” But the real challenge was figuring out the content strategy. I started thinking about what types of content I needed, how it should be created and posted, and so on.
It’s important to ask yourself questions like “What content will I create?”, “How often will I post?”, “Where will I write from?” These questions help you understand the end result better and avoid over-engineering.
My initial thought was to use Strapi to easily publish from any device and any location, but then I realized that would be overkill for a small, minimalistic blog, so I stick with markdown.
Markdown is great - it’s a standard, it’s easy to customize (MDX), and it has built-in backups through Git since it’s used locally. Plus, writing in markdown feels natural and distraction-free. It’s also easy to edit markdown files and push changes to the app through Obsidian, but I’ll describe that workflow later in this post.
Implementation
App initialization
Getting started with Astro is straightforward. I ran npm create astro@latest my-blog and chose the minimal template. Astro is such a great tool because when you initialize your app, you’ve done 50% of the work. There’s still content setup and styles to handle, but in general, Astro makes everything magical and easy. The initial folder structure is clean and intuitive:
src/
├── components/     # Reusable UI components
├── content/        # Content collections (posts, pages)
├── layouts/        # Page layouts and templates
├── pages/          # Route-based pages
└── styles/         # Global styles
The key concept in Astro is component islands. Instead of shipping JavaScript for the entire page, you only send JavaScript for the components that need it. This means your static content loads fast, and interactive elements are hydrated only when necessary.
For routing, Astro uses file-based routing in the src/pages/ directory. A file like src/pages/about.astro becomes /about, and src/pages/posts/[slug].astro creates dynamic routes for individual posts.
Content
Astro has excellent built-in support for content management. The src/content/ directory is where all your content lives, and Astro provides a powerful content collections system that gives you type safety and validation.
You configure your content collections in src/content.config.ts. This file defines the schema for your content - what fields are required, what types they should be, and any validation rules. For example, you can specify that every blog post needs a title, description, and publication date.
import { defineCollection, z } from "astro:content";

const posts = defineCollection({
  schema: z.object({
    title: z.string(),
    description: z.string(),
    pubDate: z.date(),
    slug: z.string().optional(),
  }),
});

export const collections = {
  posts,
};
The collections system automatically generates TypeScript types for your content, so you get autocomplete and error checking when working with your posts. It also handles frontmatter validation, ensuring your content follows the defined schema.
Astro has native support for markdown files, but if you want enhanced markdown with Astro components, you can use MDX. The MDX integration is straightforward - just install the @astrojs/mdx plugin and you can use Astro (or any other framework) components directly in your markdown files. This gives you the best of both worlds: the simplicity of markdown with the power of interactive components when needed.
My initial idea was to make all pages .md files, but there are some sections that can’t be static, like posts lists or latest posts. So I came up with a “container” concept. A container is basically an Astro component that grabs and prepares data, which I can then use in my .mdx files. For example, I use containers for related posts inside each post, or for displaying the latest posts on the homepage.
---
// latest-posts.container.astro
import { getCollection } from "astro:content";

const posts = await getCollection("posts");
const sortedPosts = posts.sort((a, b) => new Date(b.data.pubDate).getTime() - new Date(a.data.pubDate).getTime());
const relatedPosts = sortedPosts.slice(0, 3);
---

<h3>You might also like</h3>
<ul>
    {relatedPosts.map((post) => <li><a href={post.data.slug}>{post.data.title}</a></li>)}
</ul>
Styling
Surprisingly, styling was the easiest part. I’ve used Pico.css for styling. It’s a simple, minimalistic CSS framework. It’s easy to customize and has a lot of themes. My initial idea was to use Tailwind, but I’ve decided to stick with Pico.css because it’s simple and minimal. I’ve also added a simple dark mode switcher, since Pico has a dark mode out of the box.
Result
I’m really happy with how this blog turned out. It’s exactly what I wanted - simple, minimalistic, and focused on content. The design is clean and distraction-free, which makes reading enjoyable.
From a technical perspective, the results are solid. The blog doesn’t use many dependencies, keeping the bundle size small and maintenance simple. The folder structure is straightforward and easy to navigate, making it a breeze to add new content or make changes.
Here is my package.json.
{
  "name": "rashchupkin.com",
  "type": "module",
  "version": "0.0.1",
  "scripts": {
    "dev": "astro dev",
    "build": "astro build",
    "preview": "astro preview",
    "astro": "astro"
  },
  "dependencies": {
    "@astrojs/mdx": "^4.3.0",
    "@picocss/pico": "^2.1.1",
    "astro": "^5.7.10"
  }
}
The folder structure looks like this:
├── public/ # Static assets served directly
├── src/ # Source code
│ ├── components/ # Reusable UI components
│ ├── config.ts # Astro configuration
│ ├── content.config.ts # Content collections config
│ ├── containers/ # Data containers
│ ├── content/ # Content files (MDX)
│ ├── layouts/ # Page layouts
│ ├── pages/ # Astro pages (routing)
│ └── styles/ # Global styles
├── .gitignore # Git ignore rules
├── astro.config.mjs # Astro configuration
├── package.json # Project dependencies and scripts
├── package-lock.json # Locked dependency versions
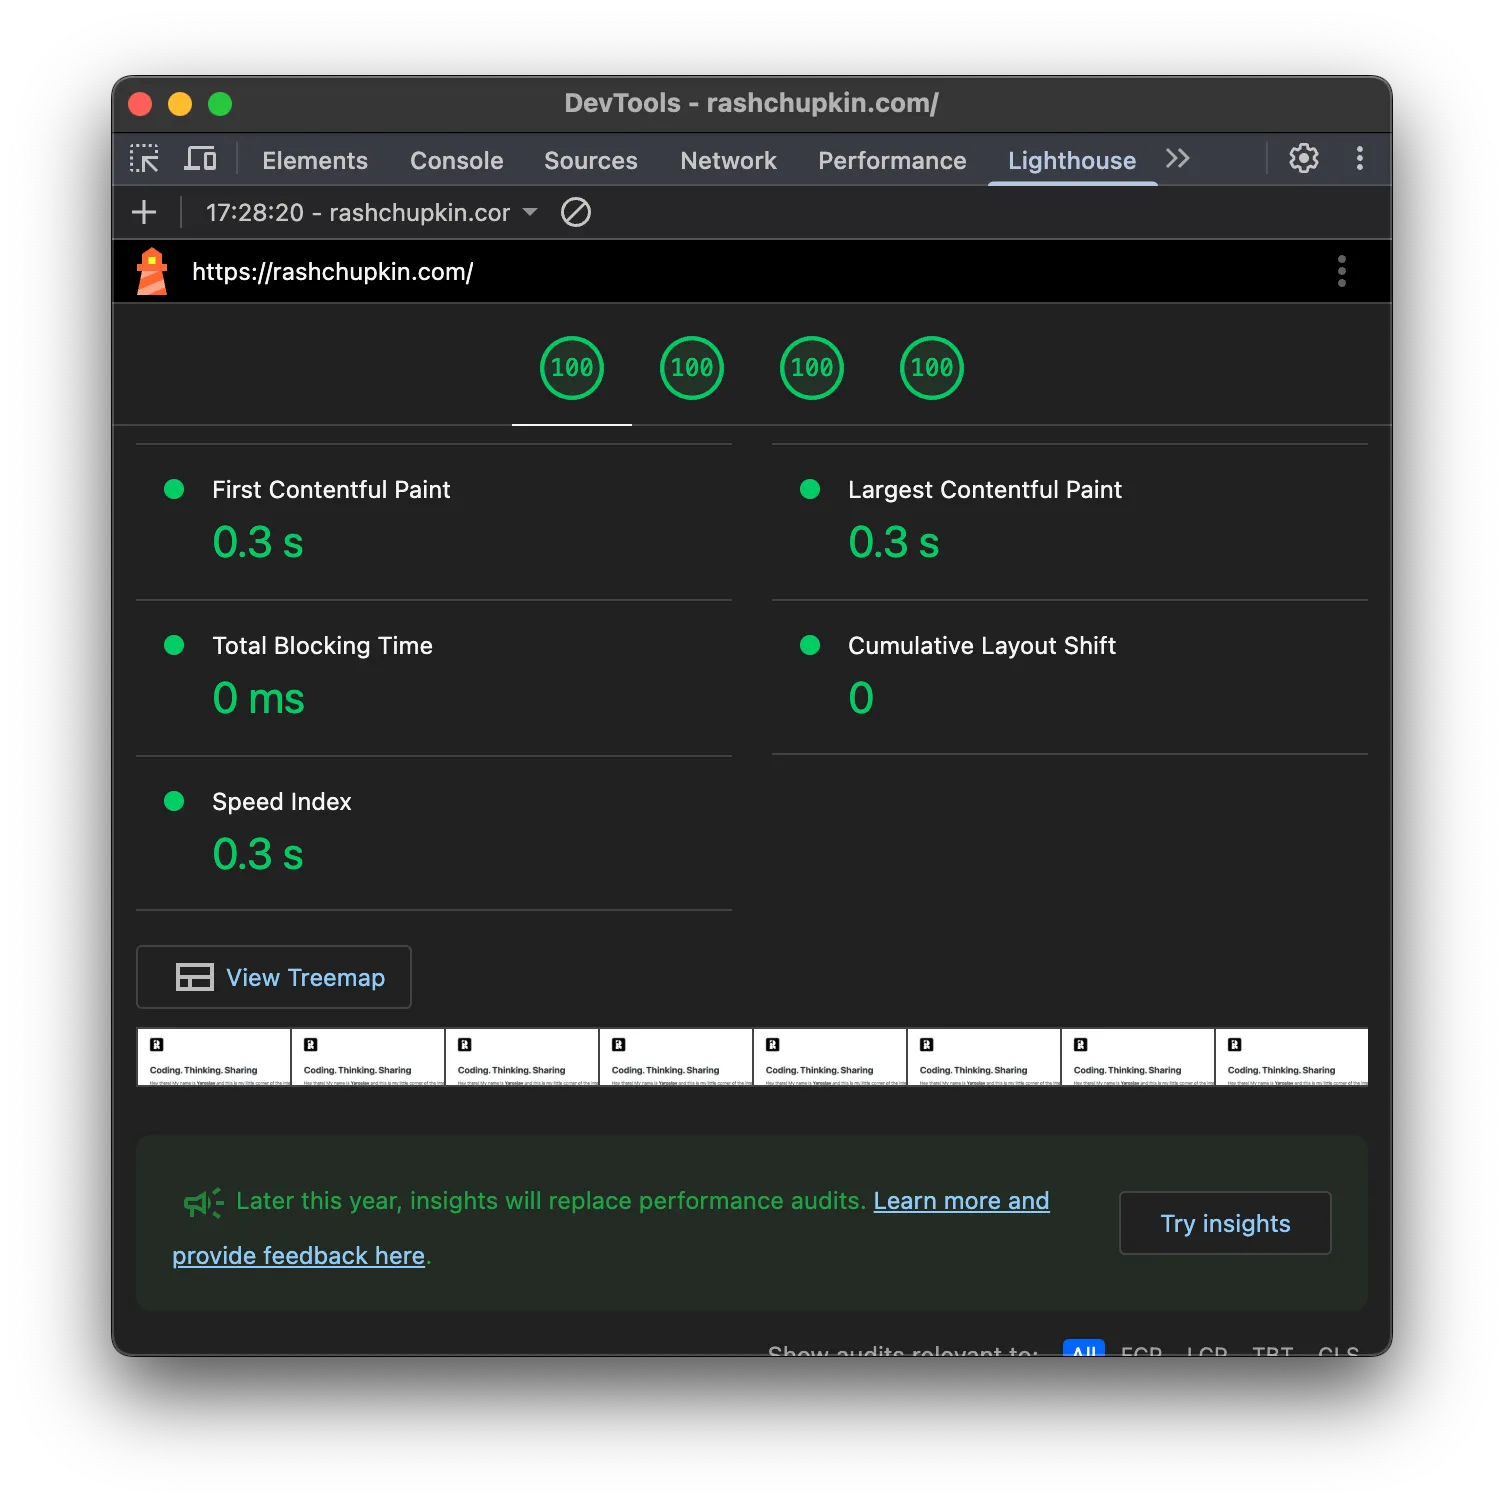
└── tsconfig.json # TypeScript configurationPerformance-wise, Lighthouse shows great results across all metrics. The site is fully static, which means it loads incredibly fast and scores well on Core Web Vitals. Since there’s no server-side rendering or complex JavaScript, the initial page load is almost instant.
The best part is that it feels like a real blog - not an over-engineered web application. It’s just content, cleanly presented, with no unnecessary complexity getting in the way.
Bonus (Editing workflow with Obsidian)
One of the best parts of using markdown files is that you can edit them directly in Obsidian. I’ve set up my project folder as an Obsidian vault, which means I can write and edit posts using Obsidian’s excellent markdown editor.
Obsidian has a great ecosystem of plugins that make this workflow even better. The Git plugin allows me to commit and push changes directly from Obsidian, so I can update my blog without ever leaving the editor. The MDX plugin provides syntax highlighting and preview support for the enhanced markdown features I’m using.
This setup means I can write posts from anywhere, with all the benefits of Obsidian’s distraction-free writing environment, and then push updates to my blog with just a few clicks. It’s a seamless workflow that keeps the focus on writing rather than technical details.

What’s next ?
I plan to make this app more universal so I can use it later as a starter. The goal is simple: run one command, fill out a config file, and have an app running in minutes.
Key features to add:
- Newsletter signup and RSS feeds
- Contact forms and feedback widgets
- Automated navigation and sitemaps
- Support for multiple languages
The vision is to create a simple, highly customizable starter app that I can use whenever I want for any purpose - whether it’s a blog, portfolio, documentation site, or anything else.
Resources and Further Reading
- Astro.js Official Documentation
- Content Collections Guide
- MDX Integration
- Pico.css Documentation
- Obsidian Official Site
- Obsidian Git Plugin
- Lighthouse Performance Testing